Did you miss me? I know there have been times where I haven’t posted for a while, and had some legitimate excuses, but folks, this time, we have had some kind of several months. The day after I published my last real blog post (this one about places in Downtown Detroit) in early July, I was admitted to the hospital for a very unexpected appendectomy. While in the throes of recovering from that, we had the unexpected death of my father in law’s partner, in the midst of a visit from “the Hungarians”. Shortly after, in Michigan, and several other states, we had some of the most catastrophic and destructive flooding ever seen. Since we had moved to a new home, you would think we were immune, but we weren’t. It wouldn’t have been so bad except that the recovery from that revealed a severe mold issue in the house we were renting. Flash forward a few weeks and we were moving, to get away from the mold. And that leaves me where we are now. In a beautiful house that we plan to call home for a long, long time. (Note here to the Hubby, if I have to pack and unpack this kitchen again in anything less than 3 years, I am throwing it all out and starting over!)
So, you see, when life hands you lemons, sometime there is a gorgeous pitcher of fresh, tasty, icy cold, bright yellow lemonade right around the corner! I can’t say this past several months were easy, but we are both happier and healthier than we have been in a while! So, take that life!
I just got the gas line installed for the stove, so there has been sporadic cooking in the last week or so, mostly to keep my father in law from starving, so no cooked posts, but I felt that this past few months might warrant a nice blog post that focuses on some food related things we don’t often think are easy to do. We’re at the time of year where we start to bundle up and prep for winter, not to mention Thanksgiving, and “our birthday” as my niece likes to call it. So, I want to talk and post a little about the reason I started this blog.
As the years pass and this blog gets older and older, I have come to realize that I really do have a passion for food, and other people not only appreciate it, but also take inspiration from it. I never could understand why people would look at me and say “Wow, you make your own pasta/pie crust/cheese? I could never do that, it’s just too hard/time consuming/scary.” I want to scream at the top of my lungs: It isn’t hard! There are so many methods it’s used when you cook, but most of them not are not difficult. If they were, they would never have survived over the years to still be in use today! What I mean is, it’s not just the act of providing nutrition for you and your loved ones, it’s an art that anyone with a little bit of time and patience can easily master. Seriously, as scattered as I am most of the time, I can whip up a batch of just about anything with the right ingredients and enough time (I stop being so benevolent at tripe… I just can not make myself do that.)
For example, think about pickling. Not the vinegar and heat based kind, which is delicious in and of itself, but the lacto-fermentation kind. You know, those tantalizingly sour Kosher pickles that you only see in the very best deli’s? Or in “Crossing Delancey”, for those of you old enough to remember “The Pickle Guy”. Honestly, it only takes a handful of ingredients and some careful sanitation and prep and once it’s done (which takes mere moments) you put it aside and let nature take it’s course. That’s it! No more paying $8 for a jar of “Bubbies” pickles (Elizabeth, really?), you can do it too and it’s so simple! This is why I started and continue this blog! I want everyone to be as passionate about this stuff as I am, because you CAN do it!
Look at this beautiful jar of deliciousness! Don’t you want to reach out and take crisp, sour bite?
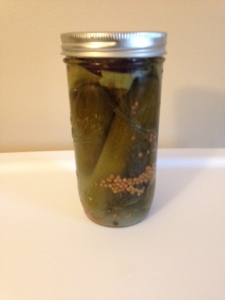
my mouth is watering just looking at them!
I am going to give you the simple rules for making these easy pickles, and I swear, you’ll be a convert in no time! All you need to remember is that everything must be clean and sterilized…. but having said that, your dishwasher will do that for you.
A few notes before I dive in. These are the sour “kosher” type pickles, not the vinegar based Vlasic type. So, once you do all the prep, you simply wait a few weeks, typically three, and you’ll have full soured pickles. If you want half soured, you go only a week and a half.
How you flavor these is entirely up to your taste. I added garlic, mustard and coriander seed, along with whole black peppercorns. If you want to use traditional pickling spice, do that. The one thing you have to be sure of when doing this, and I can’t stress it enough, is keep everything as clean and dry as possible before it goes into the jar.
After doing this several times, I have come to develop the method below. These instructions are tried and tested, and I would encourage you not to skimp on them, until you’ve made your own a few times, then you can experiment.
Homemade Lacto-fermented Pickles
- 5 tablespoons of pickling salt (you can find it in any good supermarket or an Ace/Aco Hardware store)
- 2 quarts of distilled water (important note below)
- 8 – 12 pickling cucumbers (Persian or small thin skinned are best)
- 6 – 8 cloves of garlic peeled and cracked (not minced or sliced)
- large head of fresh dill, or tablespoon of dried
- chili flakes, mustard seeds, black pepper corns, cloves or 3 tablespoons commercially produced pickling spice
- 4 Mason jars, with lid inserts
- small bowls or flat rock to weigh things down
- 6 – 8 oak/grape/horseradish leaves (optional)
In a large pourable container, combine the water and salt. Stir well and allow the salt to dissolve, and set aside. The reason the water can’t be tap water is that it contains chlorine, along with other additives. Chlorine is a deterrent to the fermentation process, and so while tap water will work, your results will take at least 4 times longer, and will be less pleasing in its quality. You may end up with hollow pickles, or pickles that are too soft. A note about the oak/grape leaves, these are to help the pickles be crunchy and hold their shape, but again, it’s optional, so don’t sweat that detail.
Prepare your jars and lids. Be sure to remove any stem or end bits from the cucumbers, and be sure they’re bruise and cut free. Place as many cucumbers in the jars as will fit, allowing a small amount of water to flow between them. Pop in the garlic cloves and sprinkle in the pickling spice or spices you choose, evenly amongst the jars. Make sure you have a dark area out in the kitchen that the jars can be stored for a few weeks. Once the jars are prepped and full of veggies and spices, pour over enough salt water to completely cover them. They may start to float, but we will fix that shortly. Once everything is covered, take the grape leaves (1 – 2 per jar) and cover the contents of the jars, tucking in the sides to cover everything. Over that, place a/several small rocks, or the small bowls with the bowl side up, over the grape leaves, this is to weigh everything down and keep them covered in water, which is critical. Place the lids and inserts over the jar and tighten well, so the rocks/bowls are pushing it all down into the brine. Set the jars in a cool dark area of your kitchen or pantry, away from light, and where the temperature is consistent. Start the wait.
Everything has to be under the liquid so no air is introduced in to the fermentation process, so that is critical. Keep an eye on the jars, and after 3 days, burp them (open the lids to let any gas out) and check to see that everything is still covered with water. You can add a little more salt water if they’re not covered but you shouldn’t have to. Going forward check and burp them each day. As the days go by, you may notice the liquid in the jar bubbling, and the cucumbers changing in color from bright green to a more drab olive. You can skim off any light mold that might form on the top of the liquid, but if the odor is bad, or there is slime along the top of the jars, discard them and sterilize the jars. you should see a slight foam, or nothing at all on the top.
After 2 weeks, open the jars and take a good smell. If they smell sour to you, and good, try a small piece to check the fermentation. At this point, it’s up to you how sour you want them. If you like them here, remove the bowls/rocks from the jars, tighten them well and put in the fridge. If not, let them keep going, and check periodically. Once they reach the peak of your taste, remove the weights and put them in the fridge and eat at your leisure. A note about pickled garlic, YUM! It’s amazing what the flavor is like.
Now, once you feel you have mastered this, you can pretty much pickle any veggie with this method. I find that asparagus is just wonderful, as is cauliflower, peppers and pearl onions, even mushrooms. And, as mentioned before, you can make these spicy with chile flakes, or play around with the spices, cumin, cinnamon for a more Persian feel. These also have some great health benefits. They’re full of beneficial gut bacteria, and are a super way to get some liquid into your diet that isn’t water.
Oh, the possibilities! Enjoy, and leave your comments below!